Help - Admin - Library
|
|
Music |
Help - Admin - Library |
Info | Login |
| |
| Programs | People | Admin | Logout |
| Library Administration |
| Features |
|
 |
| This utility is used to check out music to members for a season. |
| The Selection Box |
 |
|
The Selection Box is active throughout the Issue Music process. You can use it to confine
your work to a subset of singers and music titles for a particular season. When making selections,
the general rule is that if you change an item, all items to the right of it are reset to their
default values. Ordinarily, you should make your selections from left to right.
|
| The Function Menu |
 |
| Show Mode |
Show mode displays the current music assignments, and is the default mode for the Issue Music
utility. This is an example of a Show Mode screen at the beginning of a music issuance
when no one has music.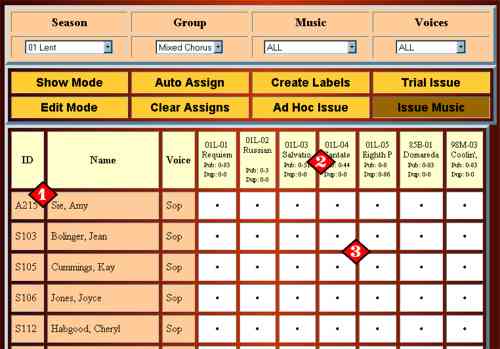
|
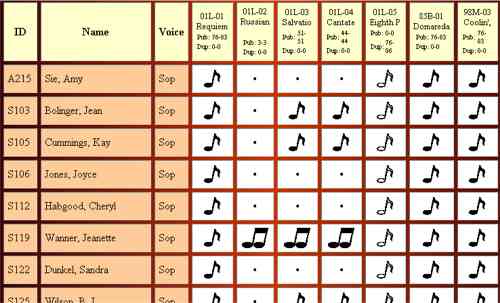
| Auto Assign |
The Auto Assign function attempts to allocate the indicated music to the selected Chorale
members. This screen shows the results of a typical Auto Assign.
 The system keeps track of music purchased by members, and does not assign additional copies of
that music to those persons. Of those remaining, if enough original copies are available,
one copy of the music is simply assigned to everyone.
The system keeps track of music purchased by members, and does not assign additional copies of
that music to those persons. Of those remaining, if enough original copies are available,
one copy of the music is simply assigned to everyone.
If there is a shortage, and duplicates are available, duplicate copies are assigned randomly using a random number generator. The exception is that the system attempts to assign originals to couples who are sharing a single copy of the music. If the librarian doesn't like the Auto Assignment for some reason, the assignment can be cleared (with the Clear Assigns button), or individually tweaked in Edit Mode. Auto Assign can be run safely even after one or more music issuances. It automatically bypasses people who already have music. This allows music to be assigned and issued in stages, or as it is received from the publisher. |
| Assignment Key |
 These are the symbols used by Music Issue. Solid filled notes indicate 'pubs' or
published original copies, and hollow notes indicate duplicates ('dupes').
These are the symbols used by Music Issue. Solid filled notes indicate 'pubs' or
published original copies, and hollow notes indicate duplicates ('dupes').
Music can be 'issued' or 'assigned'. When assigned, the music is allocated to a member but has not been confirmed. Assignments can be changed at will by the Librarian until an effective combination has been created. Once music is issued, the person is considered to be in possession of the music (whether or not the person has physically received the music), and the issuance can only be changed by executing a music receipt with either the Receive Music utility, or the Ad Hoc utility. Double notes indicate that the person does not have an actual copy fo the music, but is sharing. Duplicates can be issued with the 'destroy' flag, indicating that they are not to be returned when the Season ends. |
| Edit Mode |
Edit Mode is used to change music assignments one at a time. The screen is complicated
and takes browsers a long time to process, even on fast computers, and so is not meant
as a replacement for Show Mode.
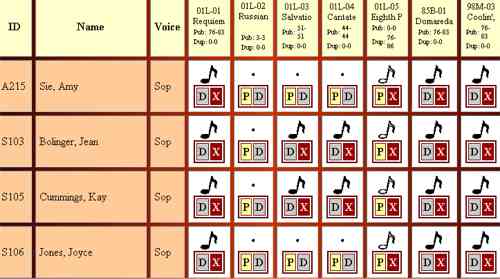 This is part of a typical Edit Mode screen. The Librarian can change assignments by
clicking on the letters inside each box. Music that has been issued cannot be changed.
This is part of a typical Edit Mode screen. The Librarian can change assignments by
clicking on the letters inside each box. Music that has been issued cannot be changed.
'P' means to assign a 'pub' to this person, and this option appears only if no music or a duplicate is assigned. 'D' means a duplicate is to be assigned, and then only if no music or a pub is already assigned. 'X' means to unassign either the pub or dupe. PLEASE NOTE: If all pubs or dups have been assigned, you must unassign one in order to reassign it. In general, when reassigning pubs or dups, you should unassign something before reassigning it. |
| Issuing Music |
After the Librarian has settled on music assignments, Issuing Music is a three-step process.
 Step 1: The Librarian runs the Trial Issue function, which does a final
check of all assignments, and produces a detailed report of what's going to take place,
plus any warnings or errors that have been encountered. The librarian can then choose to
do something about the errors and warnings, and then run Trial Issue again. Note that the
Trial Issue only looks at the Season, Group, Music, and Voices selected.
Step 1: The Librarian runs the Trial Issue function, which does a final
check of all assignments, and produces a detailed report of what's going to take place,
plus any warnings or errors that have been encountered. The librarian can then choose to
do something about the errors and warnings, and then run Trial Issue again. Note that the
Trial Issue only looks at the Season, Group, Music, and Voices selected.
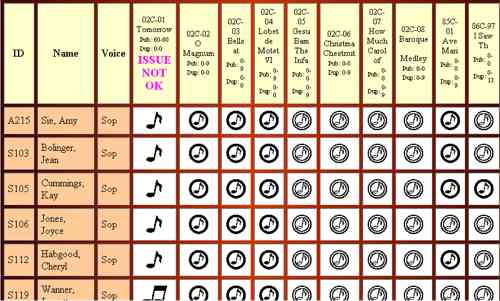
Step 2: The Librarian runs the Print Labels function, which produces a report suitable for printing labels on Avery 5163 2x4" stock. Page ejects are automatically inserted at the proper locations between sheets. The maximum number of music titles that can fit on a label is 12. Note that only labels for the indicated Season, Group, Music, and Voicing are printed. Also note that labels are only printed for assigned music, not for issued music. This allows labels to be generated for music issues in stages. Step 3: When labels have been printed, music can be Issued. This updates all files, and clears assignments for the indicated Season, Group, Music, and Voicing. The Issue Music automatically does a Trial Issue at the start, and will stop if it encounters an error. The screen above shows the results of a typical music issue. Music in the first column has not been issued because of an 'error' (in this case, the 'OK to Issue' flag in the Music master file has been set to 'No' by the Librarian). |
 |
|
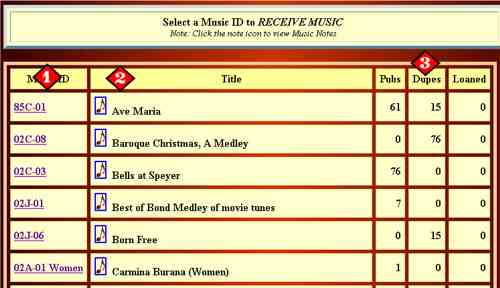
The Receive Music utility is used for checking in large batches of music, typically
at the end of a concert Season. When first started, it displays a screen similar to the
one below, which lists all outstanding music.
|
| Music Selection |
|
|
Music Checkin |
This screen appears after a piece of music has been selected.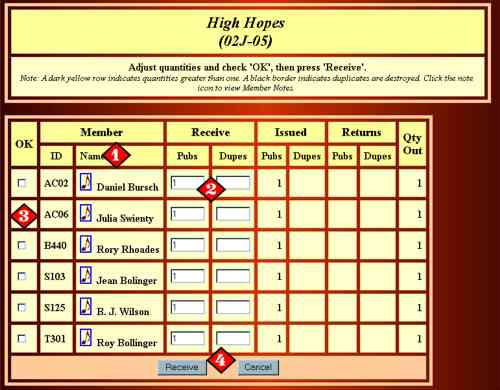
|
 |
|
The Ad Hoc Issue/Receive utility is used for moving music around during the concert
season, and for special updates.
|
|
The Library employs the equivalent of 'double-entry bookkeeping', and the Ad Hoc
utility allows the Librarian to select both sides of the transaction.
One side of the transaction is always the On Hand quantity in Music Inventory, and the Librarian specifies the amount that this quantity is to be adjusted as either a positive or negative number. The type of the transaction is partly determined by this number. Negative numbers reduce On Hand inventory by the stated amount, and positive numbers increase it. For instance, a negative number might be used when music is loaned to someone, and a positive number when it's restocked. 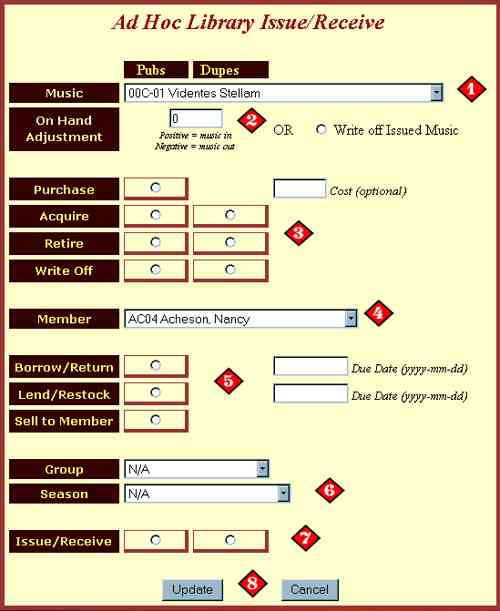 The other side of the transaction is specified by selecting one of the radio buttons. Only
one radio button may be selected, and the buttons are arranged such that any listbox information
appearing above the radio button is required, and listboxes below are ignored.
The other side of the transaction is specified by selecting one of the radio buttons. Only
one radio button may be selected, and the buttons are arranged such that any listbox information
appearing above the radio button is required, and listboxes below are ignored.
|
|
Transaction Report |
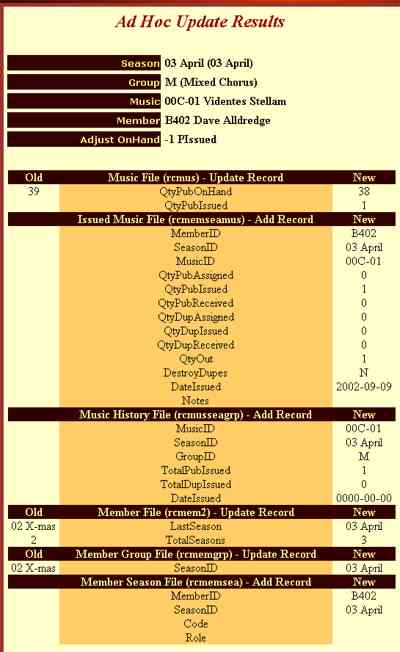 Following a successful post, a transaction report similar to this one will be displayed.
The contents of the report and the files involved depend on the transaction type.
Data in the left column represents the 'before' value of updated fields, the value in the
right column, shows the new value. In new records, the left column will be blank; in deleted
records, the right column is blank.
Following a successful post, a transaction report similar to this one will be displayed.
The contents of the report and the files involved depend on the transaction type.
Data in the left column represents the 'before' value of updated fields, the value in the
right column, shows the new value. In new records, the left column will be blank; in deleted
records, the right column is blank.
|
| Main | People | Music | Programs | Admin | Info | Site Map | Login | Logout | Help | |
| Copyright (c) 2002-2024 Rainier Chorale. All Rights reserved. Please report data problems to Webmaster and website problems to Webmaster | ||||||||||
| Optimized for IE 5+ Page /rcHlpAdmLib.php updated Thursday, April 25, 2024 9:25 am | ||||||||||